
I had the pattern... in fact I have 2 pattern for this, one from JP Ryan, and one from Black Snails. As much as I love the look of the BS it looked somewhat more complicated, and for the first time I went for the seemingly simpler one, and also, I want to keep that cutout stlye for the time I really know what I am doing.
The JP ryan comes only in one size, and after the fiasco with the stays I was a little... unsure.
As a typical American pattern, made for the lazy american sewer (see THIS post for more on that), comes with seam allowances drawn in, and the whole thing laid out so one can cut it right out... now I am a sewist grown up on BURDA magazines, with multipe pattern drawn one upon the other... I am used to copying and cutting out patterns, besides I thought I probably would want to use it again, and it would keep better all in one. So, copy and cut.
 Since I wanted to make this gown for a while now, I've been watching youtube videos, and reading blogs about how others made it, and so I know that one of the secrets of this seemingly simple bodice that the front is cut on the bias. Now the pattern itself had it drawn in paralel to the warp threads, but me, the forever advocate and admirer of the bias cut (just ask me about the shirt of Father Ralph of the Thornbirds fame), I have cut the front of the mock up on the bias, and everthing else on the straight grain.
 The first mock up looked relatively fine on the front, but as I suspected, it was too big on the back. I tried asking Norbi for help, but... Let me just put it that way... he would much rather drill holes into these concrete walls... I didn't want to drag Tilda here again (nor did I had the half day that would take her to finish work and get here), so I was left to my own devices.
 After some trial and error, and more blindly stitching some seams wider, or more curved, it looked better.
 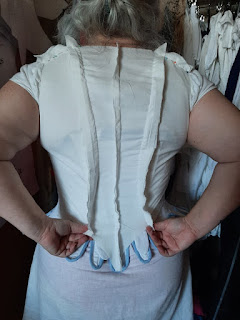 Much better, even in the front.
 Some more tweaks (I am pulling down the edge because the fabric I used for mock up is much thinner than my fashion fabric, and also I tried to imitate the weight of the skirt that will be there one day.

 Once I was relatively convinced I can't improve much of the fit, I set out to cut my fashion fabric. Now, this should be terrifying, but actually I have enough of this lovely fabric for at least one more dress, nor was it expensive, so... I could be brave, and cut.
  I didn't made to much photos of the construction, nor can I say much about the instructions that came with the pattern... I am a learned dressmaker, I have done thosands of dresses for a while in my twenties. I did read the instructions, I watched the videos, and if something was not in either of these... well, I worked it out.


One help I managed to get from Norbi is to draw the line of... the dress I use for chemise, and how far the tatoo I have on my back is reaching. One of the things I want to "improve" is how my dresses cover my tattoos.


These dresses do have some boning in them, but they don't show, mine got sewn in the lining.


 When I mentioned this in one of Facebooks 18th century sewing groups, of course, one smartie came down on my, like I don't know what am I doing, about cartridge pleating, which is just like piping, was extremely popular with the Victorians, but not used by the Geoirgians....

Another thing causing me headache, was the waistline. Having done some Victorian stuff, instictively would have turned to piping. I think, one cannot do a more beautiful finish of and edge (be it inner or outer) than piping. Besides, being pretty, my job would have been much easier, if I can stick on some piping and call it done. However, as much as Victorians loved their piping, the Georgians did not used it so I had to figure out some different method to finish the bodice. Here once again, edges are turned in facing each other and stitched down by hand.

Once my bodice was done (mostly), I needed to figure out what to do about the skirt.
Of course, what does one do, at 5 AM, when one wants to wear that dress in two days?
She thinks, hey, cartridge pleating is fun, lets do that... The most time consuming gathering technique (because it can only be done by hand).

Hahhhh, but I was prepared, Not long ago I came across this blog post arguing that in fact there actually WAS quite a bit of cartridge pleating done in teh 18th century, besides, the info museum page for the ispiration dress said... well it is in dutch, as the inspiration dress is in a belgian museum, so google translate of the page says it is an "accordion gathering", whic I can not interpret differently, but as cartridge pleating.


 After that, there wasn't much to be done, but tack down the vertical edges of the fronts and hem the bottom... So I packed up the dress, as we were going to the Campus Festival, and hoped that the road is straight enough to let me sew in the car. Hooks and eyes were sewn in at home,

 And there was one thing left to sew, another petticoat, the one with the pattern. No separate pictures or photos for that, enough to say, that the part of edges, and the waist tie that can show was done by hand, just as well the hem... sewing commenced in the car, while we were driving to celebrate the birthday of Norbi's sister.


Sooo, are you curious enough about this gown now? Do you want to see it???
Originally I wanted to do a separate post, but I already overdone the monthly planned postnumber, besides, I've teased you (and my FB friends) enough I guess.
Soo, here you go:


Let me tell you something... its been a really long time, I felt so good in some clothing, be it historical or modern. I've said before I am a learned dressmaker, I went to shcool to learn making clothes. But there is something magical about historical clothes, Every time I make one, I feel so utterly surprised..."OMG, this really looks like..." I remember the happiness and the awe when we first took on the crinolin dresses, the first time I wore my renaissance dress, the first time I took on my early victoran blue dress. The feeling of "Omg, this REALLY looks like a victorian/regency/ georgian/renaissance/etc dress."
(I am not finished with this dress and blogging yet... there is a post to be written about the hat, but now I really need to work.)
Work pictures are of my phone, modelled pictures were shot, of course, by Norbert Varga.


No comments:
Post a Comment