Friday, July 30, 2021

Hello 18th century, part 4. The gown

Since I had all those necessities the ensemble absolutely wouldn't work without, I couldn't procrastinate any longer... I don't really know, why I kept pushing it, it is just a dress, right? 

I had the pattern... in fact I have 2 pattern for this, one from JP Ryan, and one from Black Snails. As much as I love the look of the BS it looked somewhat more complicated, and for the first time I went for the seemingly simpler one, and also, I want to keep that cutout stlye for the time I really know what I am doing.
The JP ryan comes only in one size, and after the fiasco with the stays I was a little... unsure. 
As a typical American pattern, made for the lazy american sewer (see THIS post for more on that), comes with seam allowances drawn in, and the whole thing laid out so one can cut it right out... now I am a sewist grown up on BURDA magazines, with multipe pattern drawn one upon the other... I am used to copying and cutting out patterns, besides I thought I probably would want to use it again, and it would keep better all in one. So, copy and cut. 

Since I wanted to make this gown for a while now, I've been watching youtube videos, and reading blogs about how others made it, and so I know that one of the secrets of this seemingly simple bodice that the front is cut on the bias. Now the pattern itself had it drawn in paralel to the warp threads, but me, the forever advocate and admirer of the bias cut (just ask me about the shirt of Father Ralph of the Thornbirds fame), I have cut the front of the mock up on the bias, and everthing else on the straight grain. 
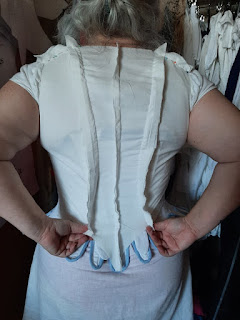
The first mock up looked relatively fine on the front, but as I suspected, it was too big on the back. I tried asking Norbi for help, but... Let me just put it that way... he would much rather drill holes  into these concrete walls... I didn't want to drag Tilda here again (nor did I had the half day that would take her to finish work and get here), so I was left to my own devices. 
After some trial and error, and more blindly stitching some seams wider, or more curved, it looked better. 
Much better, even in the front. 
Some more tweaks (I am pulling down the edge because the fabric I used for mock up is much thinner than my fashion fabric, and also I tried to imitate the weight of the skirt that will be there one day.
One help I managed to get from Norbi is to draw the line of... the dress I use for chemise, and how far the tatoo I have on my back is reaching. One of the things I want to "improve" is how my dresses cover my tattoos. 
 Once I was relatively convinced I can't improve much of the fit, I set out to cut my fashion fabric. Now, this should be terrifying, but actually I have enough of this lovely fabric for at least one more dress, nor was it expensive, so... I could be brave, and cut. 
I didn't made to much photos of the construction, nor can I say much about the instructions that came with the pattern... I am a learned dressmaker, I have done thosands of dresses for a while in my twenties. I did read the instructions, I watched the videos, and if something was not in either of these... well, I worked it out. 
For example the lining... I have learned modern sewing techniques, the bag method, when one sews up the fashion layer, and the lining separately, puts them right side facing, sews around and turn it out like a bag. I also have experience with flatlining, when one treats the layers as one. Now these stuff are done with neither, but by sewing up the outer layer, the inner layer, putting them on each other, turning the edges in and sewing down by hand. 
Here is one thing, I admittedly could not give up lining, and this strengthening the neckline with a facing... that (after sewing in the lining) turned out to have no fuction at all (as the lining hid away the cut eges of the neckline), but as an extra layer, it does stiffens the neckline, so I left it there, and would might even do it on purpose would I do this (or a similar gown) again. 
These dresses do have some boning in them, but they don't show, mine got sewn in the lining. 
Another thing causing me headache, was the waistline. Having done some Victorian stuff, instictively would have turned to piping. I think, one cannot do a more beautiful finish of and edge (be it inner or outer) than piping. Besides, being pretty, my job would have been much easier, if I can stick on some piping and call it done. However, as much as Victorians loved their piping, the Georgians did not used it so I had to figure out some different method to finish the bodice. Here once again, edges are turned in facing each other and stitched down by hand.
Once my bodice was done (mostly), I needed to figure out what to do about the skirt. 
Of course, what does one do, at 5 AM, when one wants to wear that dress in two days? 
She thinks, hey, cartridge pleating is fun, lets do that... The most time consuming gathering technique (because it can only be done by hand).
When I mentioned this in one of Facebooks 18th century sewing groups, of course, one smartie came down on my, like I don't know what am I doing, about cartridge pleating, which is just like piping, was extremely popular with the Victorians, but not used by the Geoirgians.... 
Hahhhh, but I was prepared, Not long ago I came across this blog post arguing that in fact there actually WAS quite a bit of cartridge pleating done in teh 18th century, besides, the info museum page for the ispiration dress said... well it is in dutch, as the inspiration dress is in a belgian museum, so google translate of the page says it is an "accordion gathering", whic I can not interpret differently, but as cartridge pleating. 


After that, there wasn't much to be done, but tack down the vertical edges of the fronts and hem the bottom... So I packed up the dress, as we were going to the Campus Festival, and hoped that the road is straight enough to let me sew in the car. Hooks and eyes were sewn in at home, 

And there was one thing left to sew, another petticoat, the one with the pattern. No separate pictures or photos for that, enough to say, that the part of edges, and the waist tie that can show was done by hand, just as well the hem... sewing commenced in the car, while we were driving to celebrate the birthday of Norbi's sister. 


Sooo, are you curious enough about this gown now? Do you want to see it??? 
Originally I wanted to do a separate post, but I already overdone the monthly planned postnumber, besides, I've teased you (and my FB friends) enough I guess.

Soo, here you go:


Let me tell you something... its been a really long time, I felt so good in some clothing, be it historical or modern. I've said before I am a learned dressmaker, I went to shcool to learn making clothes. But there is something magical about historical clothes, Every time I make one, I feel so utterly surprised..."OMG, this really looks like..." I remember the happiness and the awe when we first took on the crinolin dresses, the first time I wore my renaissance dress, the first time I took on my early victoran blue dress. The feeling of "Omg, this REALLY looks like a victorian/regency/ georgian/renaissance/etc dress."

(I am not finished with this dress and blogging yet... there is a post to be written about the hat, but now I really need to work.)
Work pictures are of my phone, modelled pictures were shot, of course, by Norbert Varga. 

Wednesday, July 28, 2021

Hello 18th century, part 3: questions, answers procrastinations and other underwear

 I have put up the post about the stays about a day ago, and I've been already asked  a few things... Interestingly enough, not here in comments, not even in the comments of teh pictures I've dropped on FB and Insta, but privately... Do people stopped commenting on blogs entirely? I know it is much easier to click on a like button, but...

Anyhow, some answers.

No, I have not left the zip ties in the finished stays, I've put mostly plastic boning in it, and the same steel thingie we use for crinolins (and in some parts of corsets), they are in the middle of the back and the front. I've used about 10 meters from the plastic and 4X about 30 cm from the steel boning. However, zip ties are not wrong. You can get them in places like Obi, or Praktiker. I1ve heard people even using the plastic ties, post uses to anchor some boxed packages. 

I used front lacing intentionally, as one of my aims with this ensemble (and some that are in the plans) that I should be able to dress myself. Without help. 

Fabric for stays came from where most of my fabric comes: the cheap fabric store-chain called I Love Textile (ILT). Yes, coutil and strong linen is the best, but the strong, denim-like twill of the lining and the "pearly" weave of the outer fabric should work just as well. 

And then procrastination... so just while I was not able to figure out just how to bind of the tabs I've went and done something entirely different. Like making a false rump. I did consider making pocket hoops, crescent bumpads, but I've read that the 1775-1785 English and Italian gowns I've been aming for has the deep point in the back, that looks the best with the double false rump. I took a good look at the one the American Duchess have in her book and started to cut out the pieces. Interestingly enough the fabric I used is very similar to the one the rump in the book is made from. Now this fabric did not came from ILT, I brought it back with me from Miami in the late nineties. I never used for what I originally intended, but kept putting it around. I've made corset mock up from it, lining for a linen back-pack I've made about 20 years ago, stuff like that. It is strong, it has a bit of crisp body, so...

I've cut out the "skirt" (I've read somewhere that the fals rump works without the skirt, but is more comfortable with it, for example, it will not ride between ones legs). I hemmed the skirt and sewn around the two pillows, and turned them out. And then filled them. I actually filled them with the innards of a cheap ikea pillow, which is light and fluffy, and if I manage to push it enough so it would deflate in the rump, I can always add more. I actually used about half a pillow for the two sides, but later opened them up and took out about third of each, because they were just too big. 
Historically mostly they used ground cork, probably feathers, downs, and leftover bits of fabric cut down to shreds... Now if I would make a rump for showing in live interpretation I would make them from cut up fabri (as I could not find cork), but in my ecperience that it would be much heavier. 
Then for when I already had the stays, had the rump, but I was still trying to gather my wits up to actually start on the dress, I decided to make a petticoat. An extra petticoat is not necessary, the gown wouldwork only wiht the outer one I planned, but I figured it could not hurt. 

I used the typical double tied up version that was popular from the late 16th century. Used two panels of 140 cm wide white cotton fabric. Measured the needed length on the back (over the fals rump) and at the front and noted the difference (see the AD book for details).  I've sewn together the panes, about halfway through their lengths, taking care of leaving the opening on the top at both sides. Turned in the edges of the opening, and cut the front shorter than the back (as much shorter as much is the difference between the length at the back -over the rumps- and the front. Also cut two strip of the fabric, for ties (each tie is about 3 cm wide and 140 cm long). Marked the middle of both ties and both sides of the petticoat. also marked about 30-35 cm out to each side of the middle and gathered the rop into there. (this length depend on your waist... mine has expanded alarmingly over the last few years- thank you thyroids).  Then turned and pinned the strips and stitched them down.

When you wear, first tie the back on the front:

And the front at the back: 
To make my life easier, I did sew a tiny tab into the back only to mark it: 
Now, I had the dress I use for a chemise, the stays, the false rump and an undrepetticoat. 

I could not postpone the sewing of the garment itself, but that is for another post. 

However, when the dress was finally done, there was one thing I missed... In fact I was wondering that since I do not have any kind of bag to go with this dress/period, how will I manage my small stuff like my phone...I knew that traditionally they used separate pockets, but I was not sewing them. By the time I've finished my dress, I was done. My hands hurt, my brain hurt, I was tired, and hated the whole thing. So I will have to do without a cap or a pocket... But then Norbi asked if they are really that much work... well, with a sewing machine, they are actually quite simple. So what holds you back? He asked. 

you are right: 


I used the same  fabric from Miami, and the twill tape I had leftover from the stays. 
Thats it. 
I could not push away making the dress anymore. 
To be continued with that. 


Tuesday, July 27, 2021

Hello 18th century, part 2: the 18h century stays

So stays... that are not corsets. Even though in Hungarian they are called by the same name. 
You could ask me, that I have done a corset just a few weeks ago, why can't I use that, because they are not the same.
As I mentioned in my last post, I have been hankering after the 18th century forever (even before Ive seen any Outlander or Poldark). I had patterns, I had fabricks, but I had to start with those stays,and that held me back. Seriously. Until I decided to take the plunge.
As for the pattern, of course, I could have taken something put of a book, or teh net, and enlarge it, but 1. Not enough space for that, 2. not enough time. 
I actually had three different pattern, two from teh two big amerivan pattern companies (which I have been warned might need more fitting than others) and one I bought from Redthreaded at a sale, last year. The pattern was a PDF pattern, so I needed to print it out in a shop, then puzzle the pieces together, and cut out. 


Utána jött a szabás, és a merevítőházak berajzolása... két réteg farmer-szerű anyagből szabtam li, majd összetűzögettem. Sok helyen olvastam, hogy gyorskötözőkből i sjó egy ilyen fűző, és persze, van ilyen gyorskötözőm. 
Miután összevartam az elemelet, azonnal látni lehetett, hogy bár a mérettáblázat és a pontos méreteim szerint vettem, az eredmény nagy volt, ki kellett vennem az eleje és a háta közepéből


Bg, big, big. Tilda marked the mock up, and left. I've tried, as much as I could, redraw the pattern on a new piece of paper... sewn it up, and then, it was waaay to small. I don't know, how it happened, it was small. New pattern was drawn up based on the two previous failure, and now, cut and sewn entirely.. Including the handsewn edging of the tabs... I was rather confident, that this would suit me,,, but then it was too big. 
It already gave me some shape, but I felt that it could be wastly improved... besides, I hated the endging. It was ugly. Whats more, it was fugly. 
You see, I am so ashamed of that, I only show it to have some comparison. 
So, after two days of stays making, I started again, for the fourth (or was that the fifth?) time. which I did not mind. I did ask Norbert where he would put me on a scale of 0-10 of craziness for starting over yet again, but he said , he thinks it is completely normal. (I guess there are several reasons I love that man.) 
This time, I kind of measured, that putting the stays toogether takes me 12 hours. No handsewing, or the minimal. I know, handsewn stays are the best, I also know that at least the lacing holes should be done by hand... 
However, these were/are test pieces, more like wearable mock ups, to pratice stays making, to see how it is done. I do have some really nice fabric too and as soon as I know what I am doing, I will do one that has somewhat more handsewing, and spiral lacing. 
Interestingly enough having done it a few times over, cutting out did not bothered me, and I actually enjoyed sewing up the channels... what made me want to grow hair outta my head was drewing up the boning channels. Don't ask me why I thought it was worst than sewing them up, but I felt they were. 
In the meantime, I looked up some tutorials about edging the tabs, and isntead of the bias cut strips, I dug out some heringbone twill tape, and used that:
Yes, it is a sraight tape, and somehow still worked better than the biastape I have cut out. Mind you that after sewing it up on the wrong side with the machine, I had to turn over and sew it down by hand on the right side, constantly turning under, and pushing the tape out, which put a strain on my hands. 
But I think, it was worth it.  I am much more staisfied with how this turned out.
Now the finished stays are still a smudge too big, or I should phrase, it could still be somewhat smaller, but it did hold me in, it is sercviceable, it can be used. The lace is closing thepiece completely, meaning if I ever manage to loose even 3-5 kilos, I will have to make a new one, but then I would do that happily. 

By now I hacked the heck out of that original Redthereaded pattern, that I wonder, what should I do next. By the same pattern in a size (or two size) smaller, try some entirely new pattern (I do have two other opatterns to work with), the question is still open. 
And here is a comparison of the 18th century stays, and teh mid-victorian stays I just made a few weeks ago. Ihave drawn a red line showing how the 18th century is going for a cone-shape, and the victorian for an hourgalss shape. 

Admittedly, I have been prorastinating a bit, I have done a bumpad, while trying to figure out what to do about the edging, I will show that the next time. 
So, to be continued.                                                                                                                                                                                                                                                        

Monday, July 26, 2021

Hello 18th century, part 1. Why and how

 There are still a couple of stuff, and some events I have not posted about, and I will get to them too... but now...

Now, here is a rare sight into my thought process, as sometimes how and for what stupid reason stuff gets made around here. LOL.

I've been wanting to do 18th century stuff forever now. I even have literally everything to make not one, but a number of dresses, skirts, jackets (shorter pierrot jackets as well as longer caracao jackets). Everything from materials through notions to pattens. But somehow, it always got pushed back, mostly for lack of time. 

In my favorites (among some very pretty blue dresses, there are some red ones too. I did had an exchange about how red dresses weren't a thing in the 18th century, but I had this  blogpost saved just to prove the opposite. And it didn't even have some of my favorites...

Like this one from the MET museum.

Or this one from the Museum of New Zealand.
Or this one from a belgian museum, that for some reason especially makes my heart beating faster...
And then I found this fabric at the cheap fabric store called I Love Textile.
Of course, right away I noted how similar its pattern is, and of course I bought a few meters of it. Then in the window of one of the chinese stores I saw some poppies, and in my mind it popped up, how lovely a bergere hat (so fashionable i the 18th century) would look like with a bunch of poppies and the red dress, which will be made...one day. So I checked E-bay (oh, they do have it, but it is pricey, especially if you add the shipping cost), I checked Amazon (same there), I even looked at Nehelenia, which at least would save me the hassle with the new custom-craze at the post, but well, it is still way too expensive). I have read so many post about remaking cheap hats, so I thought it would be high time I've tried it. 
And that was the point, when the penny dropped, that my reenacting teammate, Andrea will get married at the end of july, and their dress-code for the afterparty said "wear something historical". Sure, I do have a ton of histprical stuff, but I have quarantined out of most of them, and in addition after 4-5 years I am slowly getting bored of my wardrobe. A new dress could be a welcome addition, right? So I rushed in the store to get those poppies, but they only had a couple of those left. However, by that time I have decided to try and make the ensemble, and the devil may care about the fact that there is only one and a half week left until the wedding?
Furthermore we all know, that when we talk about historcal clothing, its never only a "new dress". For a new period, one need new underwear, new stays/corset, and who knows what else. Luckily I managed to get out of sewing a chemise, as last year I got a linen "dress" from FB. (I showed it to Norbi ever so proudly, as it was hanging in the doorway between my bedroom and living room. "Doesn't it looks like a tenti undershirt (tenti, as athentic, historically accurate)? But of course, that is why I bought it. 

As for the stays, doing a victiroan corset not so long ago opened my eyes, and made me braver, I still asked for help in the fitting from my friend Tilda. 
So that is what happened before.
To be continued, all right? 

ETA: Now after a couple of months later looking back I have no idea, how the hungarian and the English text got mixed up. Now its corrected, and the whole post is in English. 

Saturday, July 17, 2021

Concert in Kobuci

Finally!!! Our favorite Band in one of our favorite concert places... I guess no need for talk, pictures will do.